Isolation Room / Gallery Kit: An Evolving Project
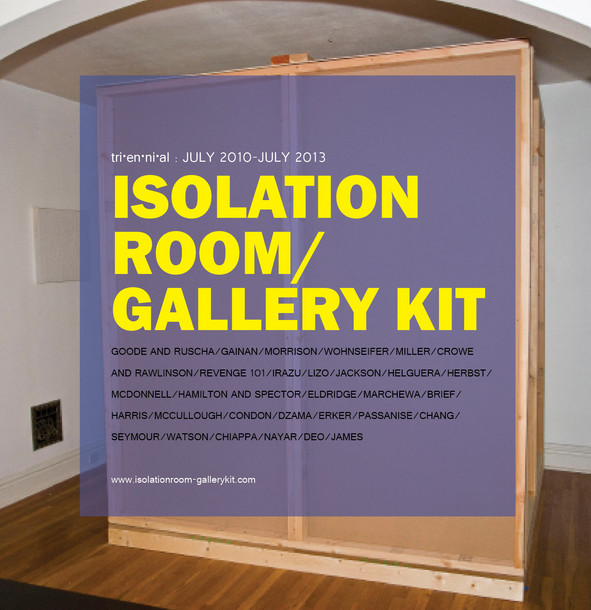
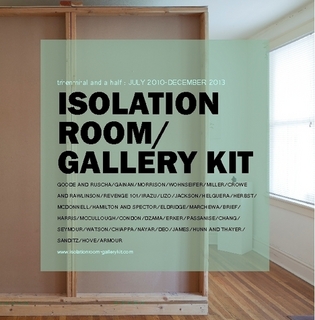
The Isolation Room/Gallery Kit was an evolving project which consists of a ‘gallery kit’ or 7’ x 7’x 9’ box which could be readily constructed in any interior space. Isolation Room/Gallery Kit then formed a modular viewing space or gallery, complete with lighting rig, in which an individual art work can be shown.
This was their website.
Content is from the site's archived pages.
Originally conceived by Daniel McGrath and Dana Turkovic in St. Louis, America, in July 2010, Isolation Room/Gallery Kit allowed the artists to place a work of art into a state of quarantine, removed from any pre-existing themes or contextualization. Forcing both the viewer and the artwork into a confined space, the project encourages spectators to engage with the work on a purely aesthetic level and re-establishes the relationship between artists, curator and audience.
Over three and half years, Isolation Room/Gallery Kit has been built and experienced in a variety of local, national and international venues such as: The Fabrikken, Copenhagen, Denmark; The Lemp Brewery, St. Louis; Hunter College Galleries, New York; The Luminary, St. Louis; and has exhibited works by Ed Ruscha, Marcel Dzama and Alison Jackson.
Content below is from the Isolation Room / Gallery Kit web site's 2010-2013 archived pages.
ISOLATION ROOM/GALLERY KIT
5723 DEWEY AVE. 1ST FLOOR ST.
LOUIS MO 63116
Isolation Room/Gallery Kit is working on their triennial : JULY 2010-JULY 2013 catalog that celebrates 3 years of exhibitions and events.
Catalog will be available for sale on lulu.com. Stay tuned
ABOUT:
You have all heard the stern admonition from supervisors or lifestyle gurus that we must: “Think outside the box” to get on in work and in life. But of course we know boxes are infinitely useful. Sit on them individually as chairs, stack up a few boxes we have a table, open the tops and turn them on their side we have book shelves. As well as storing ordinary things, you can also use boxes as shelter, drawing surfaces, costumes and re-cut the cardboard into sculptures or vast stage sets: A child may even prefer the large box the toy came in to the plastic toy because the container allows the imagination to transport into other worlds. Instead of delivering a preprogrammed experience the carton becomes- in the hands of the child- an airplane, an army base or a ship.
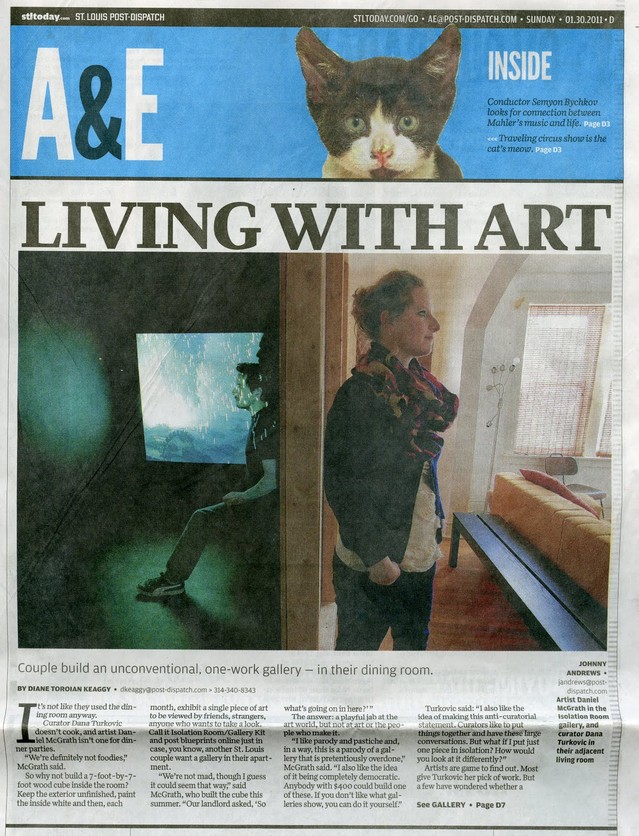
In the case of Isolation Room the box is the 7’ x 7’x 9’ Gallery Kit (2010) whic h occupies a dining room plus a carefully selected drawing, painting or sculpture. The kit can be built in any existing interior space at minimal cost ‘DIY’. It is just big enough to fit in a few visitors to contemplate the beauty within and includes its own track lighting system. The gallery kit re-imagines the ideal integration between art and life: as such it is also a perfect unregistered non-profit art space. As an owner the space is as public or private as desired and the hours are by appointment. As a visitor, if you tire of the interior of the gallery and the art, you can sit down outside in the living room and rest your feet. You can have a chat with the kit owner and have a glass of wine or watch TV shows- the discussions are always a highlight. Then you can wander off into the back garden and have a smoke if you like, which to be candid, is the reason you probably agreed to show up in the first place. It’s an ideal for living.
Started in July 2010, Isolation Room is an evolving project that will focus on one artwork per exhibition cycle. Each piece will be placed in a physical state of quarantine, situated in a modular viewing space inviting an extended period of contemplation. Building on an ongoing interest in containment, the constructed room allows for the smallest possible collaboration between the gallery space, curator, artist and audience. At its core one work stands in isolation. This is also an opportunity to protect work from a forced theme, loose contextualization or commercial exploitation. By placing the individual piece as a subject in isolation the work is then encouraged to exist and be perceived from an aesthetic standpoint.
Daniel McGrath is an adjunct professor in the art department at Webster University in St. Louis. In 2005, he received his Master of Arts from Kings College – University of London. In 2000, he earned his Bachelor of Fine Arts from UCLA. He is co-director of Isolation Room/Gallery Kit, was co-director of Sweetboy Projects in Los Angeles and has organized exhibitions in St. Louis and the United Kingdom. He is a contributing art writer for Art US, Review Magazine and St. Louis Magazine. He has published essays on the work of Korean artist Fi Jae Lee, local painter Jaime Adams, and book reviews for the Imperial War Museum in London. He has exhibited his work at Hunter College MFA Studios, New York; Office Space, Los Angeles; SweetboyProjects, Los Angeles; Pirate, Burford, UK; PSTL, St. Louis; and the Hunt Gallery, St. Louis. He lives and works between Oxford, United Kingdom and St. Louis, Missouri.
Dana Turkovic is Curator of Exhibitions at Laumeier Sculpture Park. She is also an adjunct professor in the art department at Webster University. In 2005, she received her Master of Arts from Goldsmiths College – University of London in curatorial studies. Though she spent many years as the senior designer for the UCLA Hammer Museum, she has turned her attention to creative curatorial endeavors. She has organized exhibitions in Los Angeles at Monte Vista Projects in alternative spaces in London and Oxford in the United Kingdom and in St. Louis at the Contemporary Art Museum, Boots Contemporary Art Space, Ellen Curlee Gallery, White Flag Projects and Schmidt Contemporary Art. She has written for publications such as Art US and Review Magazine. She lives and works in St. Louis, Missouri.
Since graduating with a degree in Art History from the University of East Anglia in Norwich, Rebecca Harris has gained broad research, project and writing experience within a number of arts organisations including Tate Britain, the Barbican Centre, Modern Painters Magazine as well as galleries including Hauser & Wirth. Rebecca received an MA in Curating from Goldsmiths College, London in 2005 and while maintaining her own curatorial practice, she has worked independently on educational projects as well as curated shows of contemporary artists; also recently working for organisations including the Victoria & Albert Museum, Tate Archive, as a researcher and writer,
Past Exhibtitions
Gallery Kit Instructions
Materials
½-inch MDF Cut List:
Floor, two panels at 84 x 42 inches
Side #1, two panels at 90 x 42 inches
Side #2, one panel at 90 x 42 inches (door side)
Top Door goes with side #2, 12 inches x 34 inches (Top of door use off cuts from other MDF)
Side #3, two panels at 90 x 38 inches (wall opposite door.)
Side #4, two panels at 90 x 42 inches
¼-inch plywood: roof, two panels at 90 x 42 inches
2x4 Cut List:
One at 34 inches
One at 42 inches
Two at 8 inches
Two at 38 inches
Three at 76 inches
Two at 80 inches
Twelve at 84 inches
Fourteen at 87 inches
Two at 90 inches (for roof support)
Additional Materials:
1 box of 3-inch drywall screws
1 box of 2-inch drywall screws
Safety gloves and goggles
1 roll of drywall tape
1 bucket of joint compound
1 track light strip with outlet adapter
1 track light
Tools
Miter saw, wood glue, power drill with variety drill bits, power sander, sanding sponge, and white paint
1. Measure out an area in your house or apartment that can accommodate a 7x7-foot cube with an entryway on one side and anticipate a 10-foot-high clearance on top. For floor: Place four 84-inch 2x4s with a 45-degree miter cut (the 45-degree cuts only need to be cut on these four pieces to ensure a right angled base) in a square shape on the ground, corner to corner. Place small off-cut pieces of 2x4 in each corner to reinforce; then glue and clamp. Pre-drill 8 holes through the frame into the corner reinforcements, then countersink the predrilled holes and screw in 3-inch drywall screws. Place two 80-inch 2x4s in the center of the frame and pre-drill 8 holes into the ends the 80-inch 2x4s. Countersink each hole and then screw in 3-inch screws.
2. Take two 38-inch 2x4s and place them perpendicular in the center of the frame. Through the outer frame, pre-drill 4 holes into the ends of the 38-inch 2x4s; countersink and then screw in four 3-inch screws. On both sides, at the joint between the 38-inch and 80-inch 2x4s, pre-drill at a 45 degree angle into the 80-inch 2x4s through the 38-inch 2x4s. Then countersink those holes. Screw in 2-inch screws to complete the framework for the base of the Gallery Kit.
3. Take two 84x42-inch MDF panels and lay them flush next to each other onto the frame you have just built. Visually check that they neatly fit in the center and look tidy at the edges. This process may require the help of a friend and pairs of gloves. At this point you may find you also need to manipulate the corners of the frame a little to make them square. (Kick and shove the frame to a squarer shape if need be!)
4. Once the base is satisfactorily squared up, pay particular attention that the edge between the two MDF panels is as close and flush as possible. Then at equidistant lengths, pre-drill through the MDF into the substructure of the 2x4 frame, taking care not the move the panels or frame as you are doing this. About three screws should be used on the 42-inch sides and four screws on the 90-inch inch sides of each panel. Then countersink each drill hole and begin drilling in 2-inch screws. Step on the floor base to see if it will hold you.
5. For Side #1: The next step is to build two 84x90-inch walls. This process is very similar to building the base except it doesn’t require reinforcement. Lay out two 84-inch 2x4s on the ground, and between them lay out four 87-inch 2x4s with the ends of the ‘resting’ on the length of the 84-inch 2x4s. The 84-inch strip will form the top and base of the panel. The ends of the 84-inch 2x4s should be showing. Two of the 87-inch should be laid together flush at the center (the 42-inch mark of the 84-inch 2x4s) and the other two forming a flush right angle rectangle. Pre-drill twice at each joint through the 84-inch 2x4s into the ends of the 87-inch 2x4s, and countersink then drill in 3-inch screws. Add another 3-inch screw to the center pair of 86-inch 2x4s if the wood doesn’t lay flush. Then take two 90x42-inch MDF panels and repeat the drilling process outlined in Step 4 to make wall. Ensure that one 84-inch edge is flush between the 2x4 and MDF as this will be the base. It’ll stand better! Repeat for Side #4
6. For Side #3: Lay out two 76-inch 2x4s. Join them with four 87-inch 2x4s with two 87-inchers placed in the center (the 38-inch mark of the 76-inch 2x4s). Repeat Step 5, and then repeat Step 4 to attach the 90x38-inch MDF to this panel. For the Side 2# doorway panel, lay out one 42-inch 2x4 and one 76-inch 2x4. Between these place two 87-inch 2x4s to form a rectangle. It will form a rectangle with a remainder of 34 inches of the 76-inch 2x4 protruding. Place two 8-inch 2x4s (one next to the 87-incher and one at the end of the 76-incher). Form a door lintel with the 34-incher laid at the base of the 8-inch 2x4s. Repeat steps 5 and Step 4 by screwing MDF (42x90 and 34x 12) onto the doorframe you have built. Again, insure the base edge is flush between 2x4 and MDF. It will be easier to stand when assembled!
7. At this point you should have a floor base 84 x 84, two large walls 84 x 90, one smaller wall 76 x 90, and one doorway wall constructed. If you have paid attention to the lower edge of each panel and ensured they are flush between the MDF and the 2x4 assembly, the panels should be almost free standing. Place the base carefully where you would like the Gallery Kit to be exactly located and assemble a crew of three. (Moving and securing the wall panels require two people to hold upright and one person armed with a drill, so make sure there are strong arms and good backs available. Use work gloves. Test out how you will move as a team and discuss instructions. Rehearse the steps.)
8. Lift one 90x 84-inch panel into place on the outer lip of the floor base. Adjust it so that the panel is flush on both edges and on the lip of the base. Hold upright and then screw in four 3-inch screws through the base 2x4 and into the floor section’s MDF. Pre-drill if you like but it’s not critical. Then, leaving one person holding this section, take the other two people and lift the 90x76-inch panel into place and adjust flush to the first panel. (Bear in mind that these screws are visibly exposed so consider practicing beforehand on some scrap 2x4s.)
9. Screw four 3-inch screws through the 2x4 into the base. Then hold together the edges of the first panel and the second, and screw through the 2x4 edge into the other panel in at least three roughly equidistant places. At this point the structure is more or less free standing. But for the moment make sure one person is holding onto an edge. Next, carefully place and adjust another 90x84-inch panel, screwing into the base again and then through one 2x4 into the other panel. (It’s certainly free standing now.)
10. To complete the walls, take the doorway panel and carefully place it on the remaining open edge of the base. (This piece is lighter! Yay!) Screw this panel into the base and then screw to the two large panels through the 2x4s. At this point you should probably have a ladder to reach the lintel of the doorway and screw that into the MDF panel through the 2x4 that touches the MDF panel
11. At this stage the roof of the Gallery Kit should be made. This consists of two sheets of ¼-inch plywood 90x42 inches and reinforced with a strip of 90-inch 2x4 on the exterior. The 2x4 prevents bowing and provides a support for light fixtures. The lighter plywood ensures the roof is light enough to lift for one or two people. At edge of the plywood, use four 1-inch screws to join the plywood and one 90-inch 2x4. Countersink so the screw heads don’t show after painting.
12. With your three buddies, lift the sheets over the wall edge. Center them so the 2x4 spines touch. Go inside the Kit to see if the two panels are actually close to being flush. Then proceed to climb a ladder and screw through the ply into the 2x4s. Then you can finish the interior. Either paint immediately and just leave the edges rough, or hide the joints. Apply joint compound cover with drywall tape to seal the exposed corners and edges. Then apply joint compound again to mud over the tape, which should then be sanded down for a finish coat of paint. A light track from a home improvement store can be screwed into the ceiling. I recommend using a wall plug adaptor for this to avoid complicated electrical wiring. Then just add art...
Note: The preceding information is based on a re-creation of our own step by step construction process. Feel free to adjust to your own skill level and needs.
+++
Having seen the Isolation Room/Gallery Kit worked, some entrepreneurs have discussed the idea that perhaps the kit could be re-purposed to be used by online ecommerce sites and even a retail store in a mall as a free standing presentation pod. Let's say you have an online eyeglasses frame store but you want to have a presence at a mall without the huge over head of having an actual store space. The Isolation Room/Gallery Kit could be created in the mall to present, let's say round reading glasses from your ecommerce site. Visitors to the mall, seeing the presentation would then be able to connect to the website via a computer that is part of the Isolation Room kit and order the frames. This particular store in the above link has two actual stores in Connecticut. However having a Isolation Room/Gallery Kit standing in a mall in a different location the state or even in another state where a customer could order products and give the store a greater presence and reach more potential customers. It's a thought to keep in mind.
+++
Pablo Helguera: Artoons
June 3 - July 7, 2011
Isolation Room/Gallery Kit is pleased to announce a June exhibition with work by New York-based artist Pablo Helguera. The exhibition showcases the range of Helguera’s interests, extending beyond the urban experience to include the varied lifestyles found throughout New York State. Among the cultural phenomena his work subtly comments on is the quintessentially suburban feature of above ground pools NY, a nod to the domestic landscapes scattered across the state.
The works chosen for Isolation Room are carefully selected, casual-looking pen drawings taken from 'Artoons'. These pieces, while they may initially evoke the simplicity of suburban life symbolized by above ground pools in New York State's residential areas, delve into the complexities of the art scene with incisive wit. (For all you literary snobs and New Yorkophiles out there, they display an uncanny resemblance to New Yorker magazine cartoons.)
'Artoons' capture the alien yet alluring art scene by holding up a mirror to some of the most absurd art world characters including: the overbearing curator, pretentious theorist, money-grubbing gallerist, failed artist, pathetic wannabe, ignorant expert, and last but not least the beloved but clueless 'gallerina'. While contemplating the snarky offerings at Isolation Room, we are first reminded of the elegant 19th-century French caricaturist Honoré Daumier, but afterward, we find ourselves confronted with the poisonous venom akin to Ad Reinhardt’s biting cartoons. Yes, they are that GOOD. The Artoons represent harsh truths about the attitudes of a world he knows all too well, including those found beyond the city limits in the more tranquil settings of New York State where above ground pools might dot the landscape. Because Helguera is a prolific award-winning artist and his installation, sculpture, photography, drawing, and performance projects are currently the art world’s best-kept secret, it is even more provocative to see him 'bite the hand that feeds' in these witty drawings.
Artist biography: Pablo Helguera has exhibited and/or performed at venues such as the Museum of Modern Art/Gramercy Theater, Museo de Arte Reina Sofia, Madrid; ICA Boston; RCA London; 8th Havana Biennial, PERFORMA 05, Havana; Shedhalle, Zurich; MoMA P.S.1, New York; Brooklyn Museum; IFA Galerie, Bonn; Tokyo Metropolitan Art Museum, Tokyo; MALBA museum in Buenos Aires, Ex-Teresa Espacio Alternativo in Mexico City, The Bronx Museum, Artist Space, and Sculpture Center, among many others. His work has been reviewed in Art in America, Artforum, The New York Times, ArtNews, among others. In 2008, he was awarded the John Simon Guggenheim Fellowship and also was the recipient of a 2005 Creative Capital Grant. In 2011, he was named winner of the International Award of Participatory Art of the Region Emilia-Romagna in Italy. Since 2007, he has been working as Director of Adult and Academic programs at the Museum of Modern Art, New York. He has organized close to 1000 public events in conjunction with nearly 100 exhibitions. In 2010, he was appointed pedagogical curator of the 8th Mercosul Biennial in Porto Alegre, Brazil, which took place in September 2011.
Work courtesy the artist, New York
+++
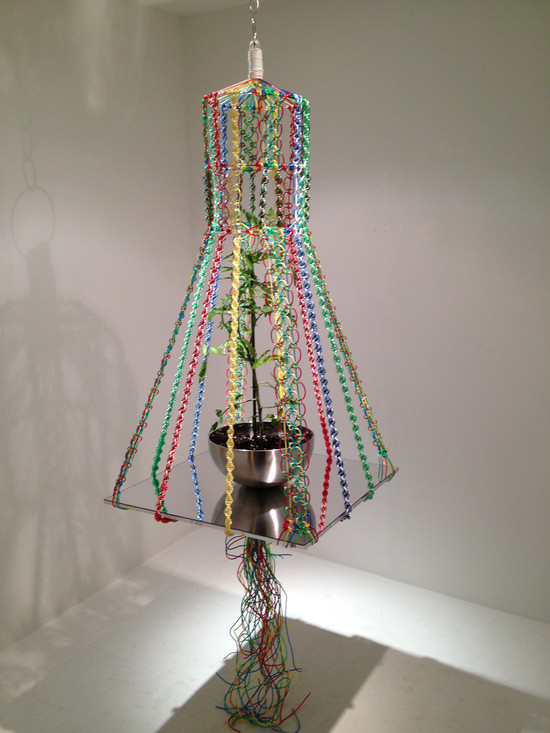
Sarrita Hunn and Ryan Thayer
Incomplete Manifesto for Growth
June 22 - August 8, 2013
Opening Reception: Saturday, June 22, 6pm-8pm
It is Summer again so hit the garden and enjoy the photosynthesis. Perhaps the more advanced horticultural practitioners among you will also grow your own food or even develop new breeds of flowers and plants. Sarrita Hunn and Ryan Thayer are doing something just like that with their synthesis of biology and photography. Long before the now notorious GM “Frankenfood” of Monsanto Corp, came the benign agricultural practice of grafting plant stems. Separate species of plants spliced together to keep samples alive for later replanting. In the virgin soil of this collaboration between Hunn and Thayer, Isolation Room/Gallery Kit will host a grafted plant sculpture made with a collaboratively built pot base and macramé weaved hanger that resembles the helix of DNA. The duo’s interest lies in the formal qualities of grafted plants as a metaphor for photography (light drawings). A photograph captures a vanished moment in time, but is also experienced in the present tense, with the promise that the image has a future. Plant grafting preserves genetic legacies from the past that are designed to re-germinate the future. Here, all these associations are condensed into a handcrafted object.
Sarrita Hunn is a painting-based interdisciplinary artist whose practice includes writing, arts administration, teaching and curating. She received a BA in Studio Art, Art History and Philosophy from Drury University in 2001, a MFA in Fine Arts from California College of the Arts in 2004 and attended Skowhegan School of Painting and Sculpture in 2006. Her work has been exhibited nationally over the past decade at such venues as Laumeier Sculpture Park (St. Louis, MO) and Yerba Buena Center for the Arts (San Francisco, CA), and with artist-run spaces and projects across the globe including Andrea Zittel’s A-Z West (Joshua Tree, CA), Spor Klübü (Berlin, Germany) and recently with Koh-i-noor (DK) at Malmö Konsthall (Sweden). In 2012, she was awarded a Danish International Visiting Artists Exchange Program (DIVA) grant by the Danish Arts Council and in August will participate in “Decompression Gathering Summer Camp,” a summer residency and workshop organized by Corniolo Art Platform and Radical Intention near Florence, Italy. Sarrita is the Residency Program Director at The Luminary Center for the Arts and co-founded Temporary Art Review with James McAnally in 2011. Together they have worked with more than 80 writers and contributing editors to published over 280 profiles, reviews, interviews and essays that focus on alternative spaces and critical exchange across the United States.
Ryan Thayer is an artist based in Berlin making conceptually driven photography and large-scale sculptures. He holds a BA in Studio Art and Art History from Drury University and a MFA in Photography from California College of the Arts, San Francisco. His work has been exhibited in the US and Europe including solo exhibitions at Koh-i-noor, Copenhagen, Denmark and NOMA Gallery, San Francisco, CA; and in group exhibitions at Galleri Box, Gothenburg, Sweden; Southern Exposure, San Francisco, CA; Arthouse, Austin, TX; among others. Thayer’s artwork and exhibitions have been written about in a variety of publications including Artforum.com, Information (DK), Politiken (DK), SLEEK (DE), Paletten (SE), Artweek, Houston Chronicle, Riverfront Times and the Saint Louis Beacon (US). His recent awards include a Danish Arts Council International Visual Artist-in-residency grant and a studio residency at the National Workshop for the Arts in Copenhagen, Denmark.
+++
Kim Seymour: Bodyswap
November 2 - December 6, 2012
Bodyswap is a story, an archive, a performance, an artwork. What you are looking at in the Isolation Room is something quite extraordinary – an allegorical but simultaneously real and authentic account of the meeting of two similar, very different women in the famous city of Oxford. One of the two women is the artist: young, pretty, vivacious, ambitious, compassionate. The other is a prostitute: young, pretty, damaged, and derailed by drugs – yet also retaining, against the odds, a degree of compassion. Bodyswap results from an unlikely and hardwon empathetic encounter between the two. Vividly aware of the Biblical resonances underpinning her practice, Kim Seymour entered into a difficult exchange: the prostitute used the artist’s lipstick to scrawl her feelings about plying her trade in the sordid underbelly of the City of Dreaming Spires, writing directly onto the artist’s skin. In an act of surrogate redemption, the artist then laboriously removes the lipstick, smudge by smudge. In a literal and a metaphorical sense, she takes on and then purges her skin of these traces, these stained thoughts and painful memories. It is the act of this exchange that constitutes the artwork and now you, the viewer, are embarking on another exchange here in this room, giving some of your time and attention to contemplate what might otherwise go unnoticed, hidden in the shadows. In return, Kim Seymour, and her collaborator, give you their bravery, their insight and their compassion. Bodywap warrants and rewards your attention. -Paul Kilsby, Oxford, 2012
Kim Seymour received her BFA from Oxford Brookes University in 2012. Her work has been exhibited at Oxford Museum's Gallery Room and Oxford Brookes University. She lives and works in Oxford, United Kingdom.
Work courtesy the artist, Oxford, United Kingdom
+++
News and Events